Big Bag Gif Funny Hard to Walk
If a picture is worth a thousand words, then an animated GIF is worth 10,000. Or maybe 50,000? A million, perhaps? OK, let's not overanalyze the metaphor! The point is, GIFs are amazing. They're like the flipbooks of the internet — great for conveying thoughts and emotions that words can't describe, showcasing the antics of your adorable household pets, making abstract art, or giving you a good chuckle.
GIFs are modest, generally rendered in low resolution and limited frame rate, yet the format has become a darling of the internet. It served as an early example of something you could do online that you couldn't do in print and has survived mostly unchanged since its inception in the late 1980s, remaining popular today despite the dramatic rise in high-quality web video formats. This, of course, only makes the humble GIF even more impressive.
Maybe you've used a GIF on your phone to send a funny animation to a friend, or you've seen them pop up in comments on Facebook. But have you ever made your own GIF? You may have ideas for the grandest of GIFs, but maybe you don't know how to make that dream a reality. No need to worry: This simple tutorial should guide you through the process of making top-notch GIFs, even if we can't definitively tell you how to pronounce it.
How to make an animated GIF from a video (Photoshop)
Before we jump right into the tutorial, we should address the elephant in the room. Adobe Photoshop is probably the best software available for making GIFs (or editing images in general). If you don't have Photoshop, other programs can give you some of the same functionality, such as GIMP, but if you want to get serious about making GIFs, Photoshop is the way to go.
Step 1: Find a good video sequence on the web that you want to turn into a GIF. This can be practically anything, but try to opt for a clip that is not too long, as brevity is key for a good GIF.
Step 2: Save the video to your computer. Check out our guide on how to download YouTube videos if you need guidance on ripping footage from the web. Trim the footage down to only the length you want the GIF to play. Two or three seconds is great, five is pushing it, and 10 or more is possible with the right chopping, but the file will be large and hard to work with. The general rule of thumb is to convey your idea in as few frames as possible.
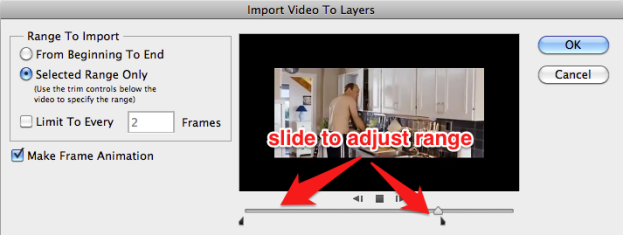
Step 3: Open the video with Photoshop. To do this, navigate to File > Import > Video Frames To Layers. Select the video file you want, and Photoshop will open it as a series of still frames. You can choose to import the entire video from beginning to end or use sliders to select a smaller portion of the clip. You can limit the import to every other (or every third, fourth, etc.) frame to make the file smaller, but this will also make the video choppier.
Step 4: Mess with the settings. You can adjust color balance and whatnot with Photoshop at this point if you'd like. When you have everything looking perfect, head to File > Save For Web. You'll then be met with a window that looks something like this:
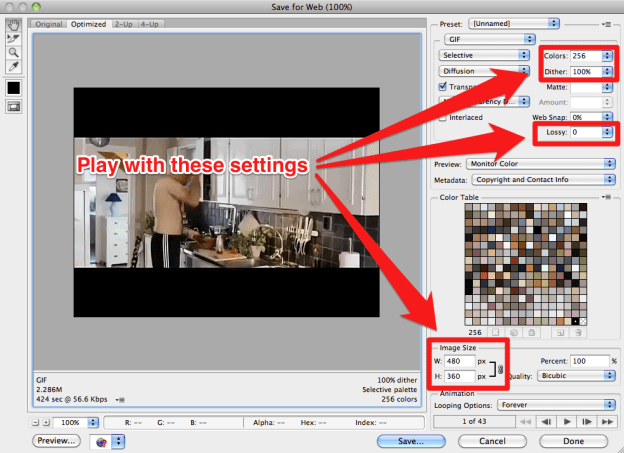
You can tweak these settings to make your GIF smaller. Ideally, you'll want to make it no larger than 1MB so it won't take ages to load on webpages. Play with all of these until you find a sweet spot.
- Colors: This limits the number of colors used to create the image, so the higher, the better (GIFs are limited to a maximum of 256 colors). Only drop down to 128 or lower if you must or if your GIF doesn't have much color in the first place.
- Dither: Dithering scatters different colored pixels in an image to make it appear as though there are intermediate colors in images with a limited color palette. Higher settings will yield better-looking images, but this will also make the file larger.
- Lossy: Use this setting to apply an intentional drop in quality. A lower setting is better, but some loss of quality might be necessary to make your file small enough.
- Size: Changing the dimensions of your GIF can have a huge impact on the file's size.
Step 5: Save and share! Hit the Save button to finalize your creation. Once done, you can upload it to a free image hosting site like Imgur to share it with your friends and embed it into blogs and websites.
How to make an animated GIF using still images (Photoshop)
You can also create animated GIFs in Photoshop by stringing together still images. This process consists of layering each frame from the bottom up and then sequencing the layers using Photoshop's animation/timeline tool.
Step 1: Collect the still images you want to sequence for your GIF and put them in a single folder. Then, in Photoshop, click File > Scripts > Load Files Into Stack. Then, click Browse and select the images on your desktop that you want to string together into a GIF.
Select OK, and a new composition should open with these stills now rendered as individual layers in a single image. Arrange them accordingly; your first frame should occupy the very bottom layer and so forth.
You can also create each layer individually in Photoshop itself rather than batch uploading your stills as layers. Run Photoshop and create a new image by clicking File > New and then selecting OK. Then, unlock the background layer by double-clicking the Lock icon, create a new layer by opening Layer > New… > Layer, and design each frame accordingly.
Again, string your animation from the bottom up. (This process works if you are using an older version of Photoshop that does not feature a "Load Files into Stack" option.) Load your stills into Photoshop, drag them into your new project, and resize the newly created layers accordingly using Photoshop's transform tool (E dit > Free Transform or Ctrl + T), then drag the corners to resize the object).
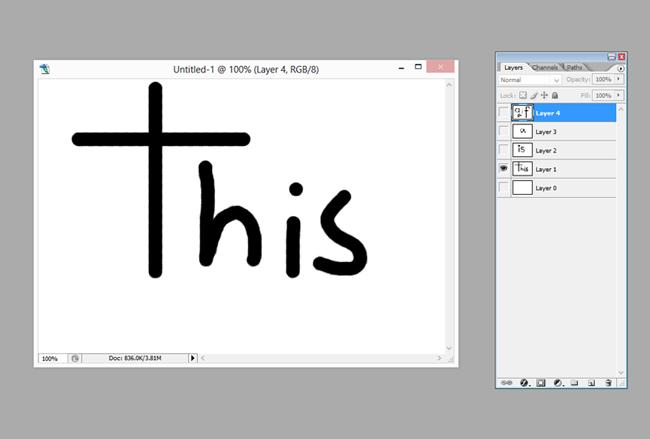
You want your result to look like this, with each frame of the animation separated as a layer and arranged chronologically from the bottom up:
Step 2: Now that you've arranged your layers accordingly, you can begin sequencing your layers. Again, this process will vary depending on what version of Photoshop you are using. If you're still running CS5 or lower (hey, we won't judge), access the animation window by opening Window + Animation. Likewise, click Window + Timeline in Photoshop CS6 and Photoshop CC to access the Timeline window. For Photoshop CC, click the drop-down menu in the middle of the Timeline window and select Create Frame Animation.
Once you've opened Photoshop's sequencing tool, click on the small, right-facing arrow in the upper-right hand corner, and then select Make Frames From Layers.
You can also click on the right-facing arrow to create a new frame manually (or you can use the hot-key command Ctrl > Shift > Alt > F). From there, use the Eye icon next to each layer to hide the layers you don't want to appear in the frame you've created.

From here, use the menu underneath each frame to toggle its duration. The menu in the bottom-left corner dictates how many times your GIF will replay — set it to Forever if you want it to loop endlessly.
Step 3: Congratulations! You've created an animated GIF using still images, and now all you have to do is export it out of Photoshop using the process outlined above. For a quick recap:
Head for File > Save For Web. Remember to keep your GIF no larger than 1MB. If necessary, tweak the color, dither, loss, and size settings until your GIF has been resized accordingly. Once you're happy, save your newly-minted GIF.
How to make an animated GIF using still images (for free)
If you don't have access to Photoshop, there are free methods you can use to make a GIF, although the final product's quality may not be as high. There are various free programs (such as GIMP or Pixlr) that offer the basic functions of Photoshop, thus allowing you to create still images and play them in sequence, and websites that allow you to cut GIFs from video. Neither of these processes will be as effective as Photoshop — however, they are cheaper and fairly straightforward.
Using still images
Several in-browser apps allow you to make GIFs out of a series of still images. As an example, we'll use Ezgif. This site allows you to upload a series of images, arrange them, and turn them into an animated GIF. Of course, to do so will require a set of images that work in sequence. To do this, we'll need a free Photoshop substitute. We'll use Pixlr in this example.
Step 1: The first thing to do is to upload a new image. Choose the canvas size, but keep in mind that the larger the file size of a GIF, the more slowly it will load, so try to cut down on the amount of stuff you fit on the canvas. Simpler and smaller is often better.
Step 2: Once you have a canvas, make the first frame of your GIF. For this example, we'll use the shape tool to create a person out of a circle, rectangles, and lines, saving this image to create the first frame.

The animation process consists of playing a series of images with slight changes to give the illusion of movement. To make a GIF, you will need to make multiple images, each with a slight variation from the last one. For the sake of simplicity, this GIF will only have a few frames, so it will not be pretty, but it should illustrate the concept.
Step 3: For the next frame, we'll make the figure raise his arms by erasing them and drawing new arms raised upward. Save the image to create the second frame.

Step 4: Next, we'll use the Type tool to make text appear, and we'll save this image as the third frame.

Step 5: Then, we'll add some more text and save it as the fourth frame.

Step 6: With our frames ready, we will upload them to Ezgif. Select the tab labeled GIF Maker and click the Choose Files button. Select all the image files associated with your GIF.
Step 7: Next, click the button labeled Upload. When the image files are done loading, make sure they are in the correct order. You can also set the delay time, which is the time between frames, and choose how many times (if at all) you want the GIF to loop.
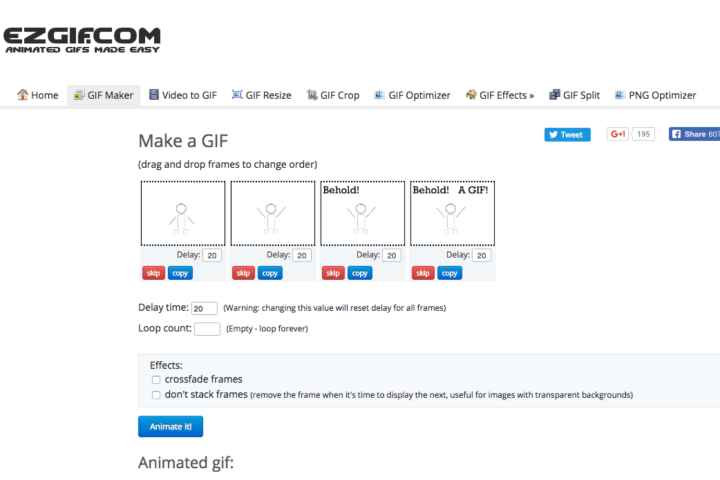
Step 8: Once done, click the button labeled Animate It!
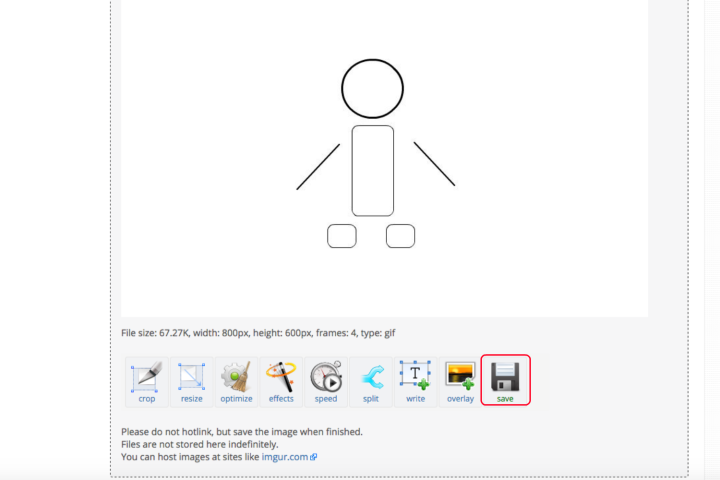
Your GIF should then appear, along with buttons to edit it or save it to your computer.
How to make an animated GIF from a video (for free)
If you want to use a particular snippet of a video for a GIF, numerous sites can help you make them with very little input on your part. Ezgif, Giphy, ImgFlip, Gfycat, and many other online services allow you to make GIFs without the aid of a credit card, although the convenience comes with a sacrifice in the level of control you have.
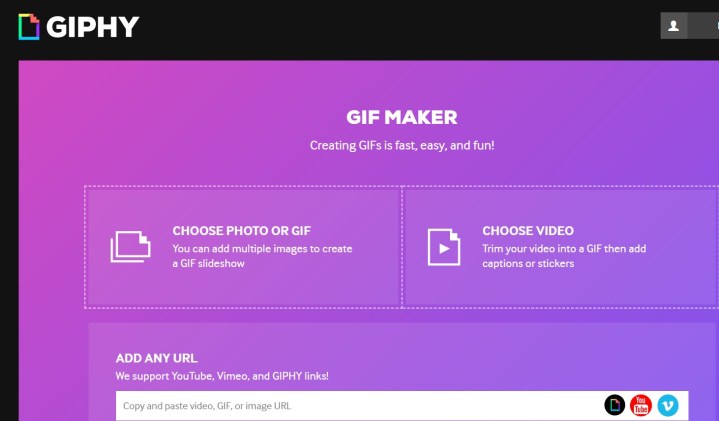
Step 1: Using one of these online tools is incredibly straightforward. As an example, we will use Giphy. This site allows you to either paste the URL for a particular video or upload a video file from your computer. Enter the URL or upload your video and continue to step 2.
Step 2: Once you have done that, you can choose the point in the video where the GIF will begin and choose how long the GIF will run. You can also enter a caption if you wish.
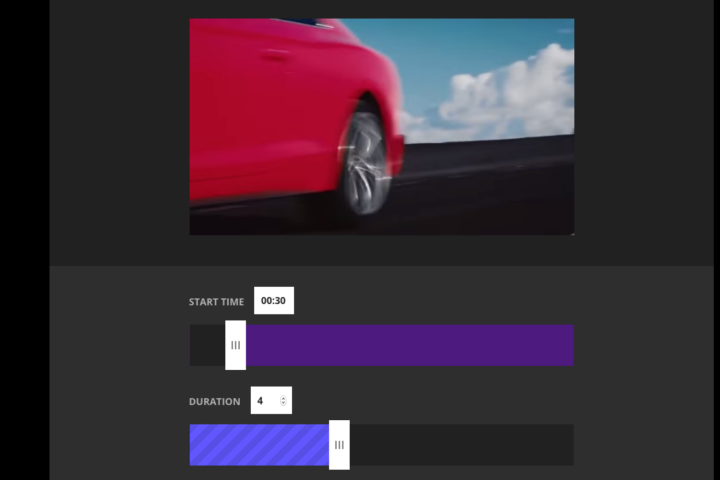
Step 3: Once you have decided on those elements, hit the Create GIF button, and allow the site to take care of the rest.
The process is more or less the same for other sites, including ImgFlip. However, if you want more control over the resulting quality of your GIF, you should probably stick with Photoshop. That said, for basic video-to-GIF functionality, sites like Giphy should work fine.
How to make a GIF from a YouTube video
You can use the above sites and more to create a GIF from a YouTube video. We have a step-by-step guide that can help you create awesome GIFs from any YouTube video here.
And that's it! You are now a GIF guru (or a GIF Jedi, if you prefer the soft "g" pronunciation), and your social media feeds are about to become infinitely more exciting. Although, we should probably caution you: With great power comes great responsibility. Choose your moments wisely, and don't flood your friends with an overwhelming onslaught of low-grade cat GIFs, no matter how cute they may be. There is a time and place, and quality always trumps quantity. The GIF may be modest, but it is also a legend; it deserves your respect. Study it, practice it, master it.
Editors' Recommendations
- Google is officially killing yet another chat app
- The most common Slack problems and how to fix them
- Twitter brings closed captioning toggle to Android and iOS
- Microsoft just turned the Edge browser into a gaming powerhouse
- Instagram is testing AI-powered video selfies to verify age
Source: https://www.digitaltrends.com/computing/how-to-make-a-gif/
0 Response to "Big Bag Gif Funny Hard to Walk"
Post a Comment